React Hooks – Examples, Definitions, and Best Practices

A React Hook is a special function in React that lets developers use state and other React features without writing a class. It makes code simpler and easier to manage by allowing functionality to be added directly within components.
React Hooks makes the code easier to read and write. It simplifies state management, enhances performance, and helps reuse logic across multiple components, making behavior consistent and easy to predict.
Building a React app? Simplify designing user interface with UXPin Merge. Arrange React components on the design canvas, manage their properties, and copy the code behind them to the dev environment. Try UXPin Merge for free.

What is a React Hook?
A React Hook is a special function provided by the React library that allows developers to use state and other React features in functional components.
Before the introduction of hooks, functional components were stateless and lacked lifecycle methods, limiting their capabilities compared to class components. Hooks solve this by enabling state management and access to lifecycle features within functional components, making them more powerful and versatile.
What does a Hook do?
A React Hook is a special function that allows you to “hook into” React features and lifecycle methods within functional components. Hooks enable you to use state, manage side effects, access context, and perform other tasks that were previously only possible with class components.
Why Hooks were introduced?
Hooks were introduced in React 16.8 to address several key issues and enhance the functionality of functional components.
Before Hooks, functional components were stateless and could not directly handle side effects, which limited their utility. Developers often had to convert functional components to class components to incorporate state or lifecycle methods. Hooks resolved this limitation by enabling functional components to be stateful and manage side effects, making them more powerful and flexible.
Additionally, sharing stateful logic between class components could be cumbersome and repetitive, often relying on patterns like render props and higher-order components (HOCs) that led to complex and less readable code.
Hooks improve code reusability and composition by allowing stateful logic to be extracted into reusable functions. They also simplify and clean up the code, eliminating the verbosity and complexity associated with class components and using this keyword.
By encapsulating and isolating related logic within custom hooks, Hooks enhances the codebase’s maintainability, making it easier to understand and manage. Furthermore, Hooks are backwards-compatible, allowing for gradual adoption. This means existing class components can remain unchanged while new components can be developed using Hooks, facilitating a smoother project transition.
How many Hooks are in React?
In the latest version of React, v18.3.1, a total of 15 React Hooks are available.
Let’s begin by stating some of the most widely used ones.
- useState
- useEffect
- useContext
- useReducer
- useMemo
- useRef
- useCallback
- useId
- useDebugValue
- useDeferredValue
- useImperativeHandle
- useInsertionEffect
- useLayoutEffect
- useSyncExternalStore
- useTransition
Two new hooks on the horizon are currently in an experimental state and outside the scope of this article.
- useActionState
- useOptimistic
Types of React Hooks with Examples
Let’s delve into the functionality of each hook through individual examples.
1. useState
useState allows functional components to have state variables.
import React, { useState } from 'react';

function Counter() {
  const [count, setCount] = useState(0);

  return (
    <div>
      <p>You clicked {count} times</p>
      <button onClick={() => setCount(count + 1)}>
        Click me
      </button>
    </div>
  );
}
Inside the Counter function, the useState Hook creates a state variable called count, initialized to 0. The setCount function is used to update this state.
When rendered, this component displays the number of times the button has been clicked. Each click updates the count state, causing the component to re-render and display the updated count.
2. useEffect
useEffect performs side effects in functional components, such as data fetching, subscriptions, or manually changing the DOM.
import React, { useEffect, useState } from 'react';

function DataFetcher() {

  const [data, setData] = useState(null);

  useEffect(() => {

    fetch('https://api.example.com/data')

      .then(response => response.json())

      .then(data => setData(data));

  }, []); // Empty array ensures the effect runs only once

  return (

    <div>

      {data ? <pre>{JSON.stringify(data, null, 2)}</pre> : 'Loading...'}

    </div>

  );

}
The useEffect Hook performs a side effect when the component mounts. The empty dependency array [] ensures this effect runs only once when the component mounts.
When rendered, this component fetches data from the specified API once, updates the state with the fetched data, and displays it. While the data is being fetched, it shows a loading message.
3. useContext
useContext allows functional components to subscribe to context changes.
import React, { useContext } from 'react';

import { ThemeContext } from './ThemeContext';

function ThemedButton() {

  const theme = useContext(ThemeContext);

  return (

    <button style={{ background: theme.background, color: theme.color }}>

      I am styled by theme context!

    </button>

  );

}
Inside the ThemedButton function, the useContext Hook is used to access the current value of ThemeContext. The useContext Hook returns the context value, which is stored in the theme variable.
When rendered, this component displays a button styled according to the theme provided by ThemeContext.
4. useReducer
useReducer manages state with a reducer, an alternative to useState for more complex state logic.
import React, { useReducer } from 'react';

const initialState = { count: 0 };

function reducer(state, action) {

  switch (action.type) {

    case 'increment':

      return { count: state.count + 1 };

    case 'decrement':

      return { count: state.count - 1 };

    default:

      throw new Error();

  }

}

function Counter() {

  const [state, dispatch] = useReducer(reducer, initialState);

  return (

    <div>

      <p>Count: {state.count}</p>

      <button onClick={() => dispatch({ type: 'increment' })}>+</button>

      <button onClick={() => dispatch({ type: 'decrement' })}>-</button>

    </div>

  );

}
Inside the Counter function, the useReducer Hook is used to manage the component’s state. useReducer takes the reducer function and initialState as arguments. It returns the current state (state) and a dispatch function to send actions to the reducer.
When rendered, this component displays the current count and provides buttons to increment and decrement the count, updating the state accordingly.
5. useMemo
useMemo optimizes performance by memoizing a calculated value, preventing expensive recalculations on every render.
import React, { useState, useMemo } from 'react';

// An example function that simulates an expensive calculation
function expensiveCalculation(num) {
  console.log('Calculating...');
  for (let i = 0; i < 1000000000; i++) {} // Simulate a heavy calculation
  return num * 2;
}

function MemoExample() {
  const [count, setCount] = useState(0);
  const [input, setInput] = useState('');

  // useMemo to memoize the result of the expensive calculation
  const calculatedValue = useMemo(() => {
    return expensiveCalculation(count);
  }, [count]); // Only re-calculate if 'count' changes

  return (
    <div>
      <h1>useMemo Example</h1>
      <div>
        <button onClick={() => setCount(count + 1)}>Increment Count</button>
        <p>Count: {count}</p>
        <p>Calculated Value: {calculatedValue}</p>
      </div>
      <div>
        <input
          type="text"
          value={input}
          onChange={(e) => setInput(e.target.value)}
          placeholder="Type something..."
        />
        <p>Input: {input}</p>
      </div>
    </div>
  );
}

export default MemoExample;
The useMemo hook is used to memoize the result of expensiveCalculation(count). The function is only called again if the count changes, thus optimizing performance by skipping unnecessary recalculations.
The dependency array [count] ensures that the memoized value is only recalculated when count changes, not when other state variables like input change.
The component includes buttons to increment the count and an input field to show that changes to other state variables do not trigger the expensive calculation.
6. useRef
useRef provides a way to access and persist a mutable value across renders, often used to directly interact with DOM elements.
import React, { useRef, useEffect } from 'react';

function FocusInput() {
  const inputRef = useRef(null);

  useEffect(() => {
    // Automatically focus the input element when the component mounts
    inputRef.current.focus();
  }, []);

  return (
    <div>
      <h1>useRef Example</h1>
      <input ref={inputRef} type="text" placeholder="Focus on mount" />
    </div>
  );
}

export default FocusInput;
The useRef hook creates a reference object (inputRef) that is used to directly access the DOM element. Inside the FocusInput component, the useEffect hook is used to automatically focus the input element when the component mounts.
7. useCallback
This hook memoizes a function, ensuring that the same instance is used across renders unless its dependencies change, which helps optimize performance by preventing unnecessary re-renders or re-executions of effects.
import React, { useState, useCallback } from 'react';

function ChildComponent({ onClick }) {
  return (
    <button onClick={onClick}>Click me</button>
  );
}

function ParentComponent() {
  const [count, setCount] = useState(0);
  const [text, setText] = useState('');

  // useCallback to memoize the increment function
  const increment = useCallback(() => {
    setCount(prevCount => prevCount + 1);
  }, []); // Empty array ensures the function is memoized only once

  return (
    <div>
      <h1>useCallback Example</h1>
      <p>Count: {count}</p>
      <ChildComponent onClick={increment} />
      <input
        type="text"
        value={text}
        onChange={(e) => setText(e.target.value)}
        placeholder="Type something..."
      />
    </div>
  );
}

export default ParentComponent;
The useCallback hook memoizes the increment function, which increments the count state. This memoization ensures that the increment function maintains the same reference across renders, preventing unnecessary re-renders of the ChildComponent which receives it as a prop.
The useCallback hook takes the function to be memoized as its first argument and an array of dependencies as the second argument. Here, the empty array [] ensures the function is created only once.
This setup optimizes performance by reducing the number of times ChildComponent re-renders, which is especially beneficial in larger applications.
8. useId
The useId hook generates unique IDs that can be used to associate form inputs with their corresponding labels. Inside the Form component, useId is called to create a unique id which is then used to construct id attributes for the form elements.
import React, { useId } from 'react';

function Form() {
  // Generate unique IDs
  const id = useId();

  return (
    <div>
      <h1>useId Example</h1>
      <form>
        <div>
          <label htmlFor={`${id}-name`}>Name:</label>
          <input id={`${id}-name`} type="text" placeholder="Enter your name" />
        </div>
        <div>
          <label htmlFor={`${id}-email`}>Email:</label>
          <input id={`${id}-email`} type="email" placeholder="Enter your email" />
        </div>
      </form>
    </div>
  );
}

export default Form;
The label elements use the htmlFor attribute to reference these unique IDs, ensuring proper accessibility and form behaviour.
This approach is particularly useful when creating multiple-form fields that need unique identifiers, avoiding potential conflicts or duplications in the DOM.
9. useDebugValue
This hook provides a way to display custom labels for custom hooks in React DevTools, helping with debugging and understanding the hook’s behaviour.
import React, { useState, useEffect, useDebugValue } from 'react';

// Custom hook that uses useDebugValue
function useFriendStatus(friendID) {
  const [isOnline, setIsOnline] = useState(null);

  useEffect(() => {
    function handleStatusChange(status) {
      setIsOnline(status.isOnline);
    }

    // Simulate subscribing to a friend's status
    const mockAPI = {
      subscribe: (id, callback) => {
        callback({ isOnline: Math.random() > 0.5 });
      },
      unsubscribe: (id, callback) => {},
    };

    mockAPI.subscribe(friendID, handleStatusChange);

    return () => {
      mockAPI.unsubscribe(friendID, handleStatusChange);
    };
  }, [friendID]);

  // Use useDebugValue to display a label in React DevTools
  useDebugValue(isOnline ? 'Online' : 'Offline');

  return isOnline;
}

function FriendListItem({ friend }) {
  const isOnline = useFriendStatus(friend.id);

  return (
    <li style={{ color: isOnline ? 'green' : 'gray' }}>
      {friend.name} {isOnline ? 'Online' : 'Offline'}
    </li>
  );
}

function FriendList() {
  const friends = [
    { id: 1, name: 'Alice' },
    { id: 2, name: 'Bob' },
  ];

  return (
    <div>
      <h1>useDebugValue Example</h1>
      <ul>
        {friends.map(friend => (
          <FriendListItem key={friend.id} friend={friend} />
        ))}
      </ul>
    </div>
  );
}

export default FriendList;
The useFriendStatus custom hook manages the online status of a friend by subscribing to and unsubscribing from a simulated API based on the friendID.
Inside useFriendStatus, useDebugValue is used to provide a custom label (‘Online’ or ‘Offline’) for the hook’s value. This label is displayed in React DevTools, making it easier to debug and understand the hook’s behaviour.
The FriendListItem component uses the useFriendStatus hook to get the online status of a friend and styles the friend’s name accordingly. The FriendList component renders a list of friends, demonstrating how useDebugValue can help with debugging custom hooks in a real-world scenario.
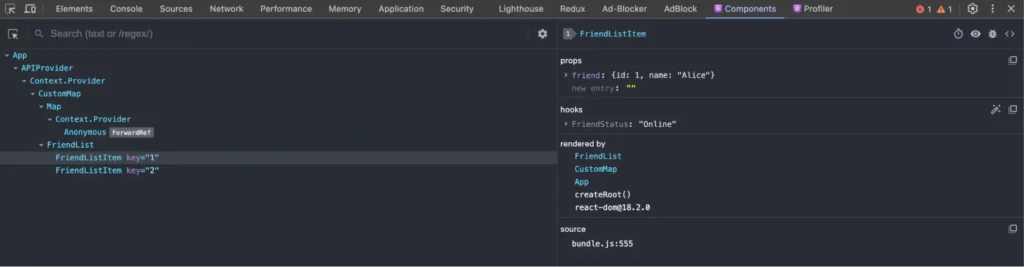
Here is how it will show on the React Developer Tools.
10. useDeferredValue
This hook defers the re-rendering of a value to avoid blocking the main thread, useful for improving performance when updating the state with expensive computations or rendering.
import React, { useState, useDeferredValue, useMemo } from 'react';

function List({ items }) {
  const deferredItems = useDeferredValue(items);
  const renderedItems = useMemo(() => {
    return deferredItems.map((item, index) => (
      <li key={index}>{item}</li>
    ));
  }, [deferredItems]);

  return <ul>{renderedItems}</ul>;
}

function App() {
  const [input, setInput] = useState('');
  const [list, setList] = useState([]);

  const handleChange = (e) => {
    setInput(e.target.value);
    const newList = Array.from({ length: 10000 }, (_, index) => `${e.target.value} ${index}`);
    setList(newList);
  };

  return (
    <div>
      <h1>useDeferredValue Example</h1>
      <input type="text" value={input} onChange={handleChange} placeholder="Type something..." />
      <List items={list} />
    </div>
  );
}

export default App;
In this example, the useDeferredValue hook is used to defer the re-rendering of the list state, which contains a large number of items.
The List component receives the list as a prop and uses useDeferredValue to defer the rendering of the items. The deferred value (deferredItems) ensures that the main thread is not blocked by expensive rendering operations, improving performance. The useMemo hook is used to memoize the list of rendered items, preventing unnecessary re-renders.
11. useImperativeHandle
Customizes the instance value that is exposed when using ref with a component. This is useful for controlling what is accessible to parent components, particularly when dealing with complex child component APIs.
import React, { useRef, useImperativeHandle, forwardRef } from 'react';

// Child component that exposes a custom instance value using useImperativeHandle
const CustomInput = forwardRef((props, ref) => {
  const inputRef = useRef();

  useImperativeHandle(ref, () => ({
    focus: () => {
      inputRef.current.focus();
    },
    clear: () => {
      inputRef.current.value = '';
    },
  }));

  return <input ref={inputRef} type="text" placeholder="Enter something" />;
});

function ParentComponent() {
  const inputRef = useRef();

  return (
    <div>
      <h1>useImperativeHandle Example</h1>
      <CustomInput ref={inputRef} />
      <button onClick={() => inputRef.current.focus()}>Focus Input</button>
      <button onClick={() => inputRef.current.clear()}>Clear Input</button>
    </div>
  );
}

export default ParentComponent;
This example defines a React functional component called ParentComponent that demonstrates the use of the useImperativeHandle hook within a child component named CustomInput. The useImperativeHandle hook is used to expose custom methods (focus and clear) to the parent component through a ref.
Inside the CustomInput component, a local ref (inputRef) is created using useRef to reference the actual input element. The useImperativeHandle hook takes the parent ref and a function that returns an object containing the methods you want to expose. In this case, the focus method sets focus on the input, and the clear method clears the input value.
The ParentComponent uses a ref (inputRef) to interact with the CustomInput component. By clicking the “Focus Input” button, the input field gains focus, and by clicking the “Clear Input” button, the input field is cleared. These interactions are made possible by the custom instance methods defined using useImperativeHandle.
12. useInsertionEffect
It runs a function synchronously before all DOM mutations, ideal for injecting styles or manipulating the DOM in a way that needs to happen before browser painting.
A pitfall of using this: useInsertionEffect is for CSS-in-JS library authors. Unless you are working on a CSS-in-JS library and need a place to inject the styles, you probably want useEffect or useLayoutEffect instead.
import React, { useState, useInsertionEffect } from 'react';

function StyledComponent() {
  const [color, setColor] = useState('blue');

  useInsertionEffect(() => {
    // Inject a style directly into the document head before DOM mutations
    const style = document.createElement('style');
    style.textContent = `
      .dynamic-color {
        color: ${color};
      }
    `;
    document.head.appendChild(style);

    // Clean up the injected style on component unmount
    return () => {
      document.head.removeChild(style);
    };
  }, [color]);

  return (
    <div>
      <h1 className="dynamic-color">useInsertionEffect Example</h1>
      <button onClick={() => setColor('red')}>Change to Red</button>
      <button onClick={() => setColor('green')}>Change to Green</button>
    </div>
  );
}

export default StyledComponent;
This example defines a React functional component called StyledComponent that demonstrates the use of the useInsertionEffect hook. The useInsertionEffect hook is used to inject a style into the document head synchronously before any DOM mutations occur.
Inside the StyledComponent component, the colour state is used to track the colour of the text. The useInsertionEffect hook is triggered whenever the colour state changes. It creates a new <style> element with the updated colour and appends it to the document head. This ensures that the styles are applied before the browser paints the changes.
The component also includes buttons to change the colour of the text, update the colour state and trigger the useInsertionEffect hook to update the styles accordingly. This setup is particularly useful for scenarios where styles need to be injected or manipulated before the DOM is painted, ensuring a smooth and flicker-free user experience.
13. useLayoutEffect
Runs synchronously after all DOM mutations but before the browser paints, useful for reading layout and synchronously re-rendering.
A pitfall of using this: useLayoutEffect can hurt performance. Prefer useEffect when possible.
import React, { useState, useLayoutEffect, useRef } from 'react';

function ResizableBox() {
  const [size, setSize] = useState({ width: 100, height: 100 });
  const boxRef = useRef();

  useLayoutEffect(() => {
    const handleResize = () => {
      const { offsetWidth, offsetHeight } = boxRef.current;
      setSize({ width: offsetWidth, height: offsetHeight });
    };

    window.addEventListener('resize', handleResize);
    handleResize(); // Initial size update

    return () => window.removeEventListener('resize', handleResize);
  }, []);

  return (
    <div>
      <h1>useLayoutEffect Example</h1>
      <div
        ref={boxRef}
        style={{
          width: '50%',
          height: '50%',
          backgroundColor: 'lightblue',
          resize: 'both',
          overflow: 'auto',
        }}
      >
        Resize me!
      </div>
      <p>
        Width: {size.width}px, Height: {size.height}px
      </p>
    </div>
  );
}

export default ResizableBox;
This example defines a React functional component called ResizableBox that demonstrates the use of the useLayoutEffect hook. The useLayoutEffect hook is used to measure and update the size of a resizable box synchronously after DOM mutations but before the browser paints.
Inside the ResizableBox component, the size state is used to track the width and height of the box. The boxRef is a reference to the box element. The useLayoutEffect hook sets up a resize event listener that updates the size state with the current dimensions of the box. It also triggers an initial size update.
The box element is styled to be resizable, and its dimensions are displayed below it. Using useLayoutEffect ensures that the size measurements are accurate and up-to-date before the browser paints, providing a smooth and flicker-free resizing experience.
14. useSyncExternalStore
useSyncExternalStore is used for subscribing to an external store that is not managed by React, ensuring that the component synchronously re-renders with the latest store state.
import React, { useState, useEffect, useSyncExternalStore } from 'react';

// Simulated external store
const store = {
  state: 0,
  listeners: new Set(),
  subscribe(listener) {
    store.listeners.add(listener);
    return () => store.listeners.delete(listener);
  },
  increment() {
    store.state += 1;
    store.listeners.forEach((listener) => listener());
  },
  getState() {
    return store.state;
  },
};

function useStoreState() {
  return useSyncExternalStore(
    (callback) => store.subscribe(callback),
    () => store.getState()
  );
}

function Counter() {
  const state = useStoreState();

  return (
    <div>
      <h1>useSyncExternalStore Example</h1>
      <p>Count: {state}</p>
      <button onClick={() => store.increment()}>Increment</button>
    </div>
  );
}

export default Counter;
In this example, a simulated external store is created with a state, a set of listeners, and methods to subscribe to the store, increment the state and get the current state. The useStoreState custom hook uses useSyncExternalStore to subscribe to the store and return to the current state.
Inside the Counter component, the state variable holds the current state from the external store. The component displays the state and includes a button to increment the state. When the button is clicked, the store increment method updates the store state and notifies all subscribed listeners, causing the Counter component to re-render with the new state.
15. useTransition
useTransition allows you to mark state updates as non-urgent, which can help improve UI responsiveness by deferring non-essential updates until more urgent updates have been processed.
import React, { useState, useTransition } from 'react';

function SlowList({ items }) {
  return (
    <ul>
      {items.map((item, index) => (
        <li key={index}>{item}</li>
      ))}
    </ul>
  );
}

function App() {
  const [input, setInput] = useState('');
  const [list, setList] = useState([]);
  const [isPending, startTransition] = useTransition();

  const handleChange = (e) => {
    setInput(e.target.value);
    startTransition(() => {
      const newList = Array.from({ length: 20000 }, (_, index) => `${e.target.value} ${index}`);
      setList(newList);
    });
  };

  return (
    <div>
      <h1>useTransition Example</h1>
      <input type="text" value={input} onChange={handleChange} placeholder="Type something..." />
      {isPending ? <p>Loading...</p> : <SlowList items={list} />}
    </div>
  );
}

export default App;
This example defines a React functional component called App that demonstrates the use of the useTransition hook.
Inside the App component, the input state tracks the value of a text input, and the list state holds a large array of items. The isPending state indicates whether a transition is pending, and the startTransition function is used to start the transition.
The handleChange function updates the input state immediately when the user types in the input field. It then uses startTransition to defer the update of the list state, creating a new array of items based on the input value. This defers the expensive operation of generating a large list, improving the responsiveness of the input field.
The SlowList component renders the list of items. While the transition is pending, a loading message is displayed.
Should you learn all React Hooks?
Whether you should learn all React Hooks depends on your specific needs and goals. While it’s beneficial to have a good understanding of the commonly used React Hooks like useState, useEffect, and useContext, you may not necessarily need to learn every single hook in detail, especially if some are more specialized and less commonly used in your projects.
Focus on learning the hooks that are relevant to your current or planned projects. As you gain more experience with React, you can explore additional hooks as needed. It’s also important to stay updated with the React documentation and community to understand new hooks and best practices as they emerge.
React Hooks Best Practices
Here are some best practices for using React Hooks. First, let’s start with the rules for using React Hooks:
1. Only call Hooks at the top level
Do not call Hooks within loops, conditions, nested functions, or try/catch/finally blocks. Instead, ensure that Hooks are always used at the top level of your React function, preceding any early returns. You can learn more about it in detail here.
2. Only call Hooks from React functions
Avoid using Hooks within regular JavaScript functions; instead, utilize them within React function components or custom Hooks. Learn in detail here.
3. Components and Hooks must be pure
Components should be idempotent, returning consistent output based on their inputs (props, state, and context), while side effects are best executed outside the render phase to prevent multiple renders and maintain user experience integrity. React official docs wrote about it in more detail.
4. React calls Components and Hooks
Avoid directly calling component functions outside JSX; instead, use them within JSX elements. Similarly, refrain from passing hooks as regular values; use them exclusively within components to maintain proper functionality. Learn in detail here.
5. Avoid Unnecessary Dependencies in useEffect
Be cautious when adding dependencies to the dependency array of useEffect. Ensure that all dependencies are necessary for the effect to run correctly and avoid unnecessary re-renders.
6. Use Descriptive Names
Choose descriptive names for your custom hooks to make their purpose clear. This improves code readability and helps other developers understand the intent of the hook.
7. Separation of Concerns
Break down complex logic into smaller, reusable hooks. This promotes code modularity and makes it easier to test and maintain your codebase.
8. Keep Hooks Simple
Aim to keep individual hooks focused on a single concern. Avoid creating overly complex hooks that handle multiple unrelated tasks.
9. Document Your Hooks
Provide clear documentation and examples for your custom hooks to help other developers understand how to use them effectively. Include information about parameters, return values, and usage guidelines.
10. Test Your Hooks
Write unit tests for your custom hooks to ensure they behave as expected under different scenarios. Use testing libraries like React Testing Library or Jest to test hooks in isolation.
Build React apps faster
React Hooks have revolutionized the way developers build and manage state in functional components, making React development more efficient and code more maintainable.
If you’re creating a React app, start with planning! Use UXPin Merge to create a layout of your app’s interface, test it with users, and then, copy the production-ready code to develop the app. Try UXPin Merge for free and design portals, dashboards, and more apps with coded React components. Try UXPin Merge.